REAL WORLD REVIEWS
My thoughts about equipments we use for our photography and things we encounter in the industry.
Arcsoft – Portrait+ (the unbiased review)
There are so many different softwares out there that are being developed and are constantly improving on how to make our workflow easy.  Each one have their strengths and weaknesses.  To be fair we havent got to use all of them, so will try my best not to generalize and make a comparison.  This review will be more on how does it benefit our own post prod and workflow.
Last month I was contacted by Arcsoft Technologies and was asked to make a review of their imaging software. I immediately said yes, I do apologize though to Ms. Hou that it took me awhile for this review.  It was only recently we got the chance to download and use the software.  This software is the “Arsoft Potrait+â€Â. Some of you may already using this and some like us just learned that there is such software.
Like any of my reviews this will be mostly and definitely straightforward. So let us start.
Arcsoft Potrait+ is designed to make photographers and graphic artists life easier. We usually enhance a portrait using Photoshop and/or Lightroom, which everyone knows, are the most popular software’s out there.  We at PVP only use these two for our postproduction. We personally believe in not manipulating ones feature so much that it will look unreal, especially in print. I am not saying I don’t like it; I actually appreciate them, those mannequin finish skin tones, they really look good for editorials. But I wouldn’t do it to our workflow, its not our cup of tea.
Have you ever tried to clean a portrait using Photoshop? What I mean about clean is removing blemishes, toning colors, whitening eyes and teeth etc. It takes a lot of skill and time to just finish one image right? Well here is where Portrait+ comes in; I was amazed how fast can this software do everything. In just one click it will automatically remove blemishes, remove scars or just tone them down, add make-up and lipstick, contour nose and cheeks, add or lessen glow and a lot more. You can even adjust them to your preferred percentage from weak to strong. You will find yourself having fun using this. It feels like you’re just playing and that any child can easily figure out how to use it. It is that easy.  By the way, it is not limited to the face only.  You can also edit the whole body for skin toning.
.png "Screen Shot 2014-09-20 at 4.20.04 PM")
.png "Screen Shot 2014-09-20 at 4.27.01 PM")
Question is how accurate is it. Well its not quite. This is something the developers need to improve on. Like what, you ask? Well for instance balancing skin tones in uneven light condition where you apply or do adjustments you want and still look natural and doesn’t look edited. To have more control which areas you only need to retouch but still having that quick functionality of pushing a button or sliding bars for adjustments. And having a bit more dot facial points to give more control of placing them in areas of the face that are in awkward positions. I can almost hear somebody’s saying, “Well that’s what Photoshop is for duh!â€Â Like I said, this is for improvement.  Though I do understand that they made this to make things easier and in some cases it somewhat does really.
.png "Screen Shot 2014-09-20 at 4.23.42 PM")
I believe that this technology will still be improving in time. The real question now is will you be willing to spend your money on something like this? Actually I’m not sure. This is now a matter of preference. For those who are in the magazine and editorial business this is a must tool. It is also priced $249.99 before to $179.99 now or $180.00 or Php7, 843.15. For me, I would love to have this as part of our editing tool, though it’s pricey in my opinion.  We personally not use 1 software only when editing, we open one image in several software’s like Lightroom then to Photoshop for finishing touches. And this will also happen here. So will it actually help your work flow faster? That will be for you to decide. Most of us don’t have the same editing habits, it is usually “what works for youâ€Â. But I do believe this tool can definitely help your editing style. It is just a matter of how you use it.
.png "Screen Shot 2014-09-20 at 4.20.38 PM")
I would like to thank Acrsoft and Ms. Hou for giving us Portrait+ to test and for letting me do an unbiased review on your software. I do believe that with this review, both developer and consumer will truly benefit in the improvement of our media.
.png "Screen Shot 2014-09-20 at 4.38.34 PM")
.jpg "ariane")
edited with Arcsoft Portrait+, lightroom and Photoshop
If you are interested in purchasing this software or even want it for a test drive you can just go to their website www.arcsoft.com and download the trial version.  Or just follow the link to go straight to Portrait+ http://www.arcsoft.com/portraitplus/ .  I promise you will enjoy playing with this software.
UPDATE NEWS!!  Arcsoft is giving away 45% discount when purchasing any Arcsoft software!  Grab this chance now!  Follow this link  http://www.arcsoft.com/
Portrait45+++++++++++++++++++++++++++++++++++++++++++++++++++++++++++++++
June 25, 2014
I shall be reviewing my Nikon D3s and Nikon d4s. This review will be more of what I don’t find online, my personal thoughts and based on my work flow, precise and straight to the point.  Not to much on the technical stuff but more of using it in the real world.

Without further ado, my review:
The most obvious changes are the ergonomics. New switches and buttons that some have moved to another area of the body. I’m not complaining though, it just takes getting used too.


D4s now with hard plastic finish on the 2 joy sticks rather than having the rubber finish on the D4

Left: D3s / Right: D4s
When they make new bodies they always make the grip a little different. It doesn’t feel awkard to hold but somehow a slight bend and curve makes a whole lot of difference and actually helps gripping or holding it much better.
")
Top: D3s / Bottom: D4s
The AF-ON button on the vertical grip of the two bodies have been placed so far apart that im constantly looking for it on the D4s during shooting when your eye is pressed againsed the view finder, again it takes getting used too.
")
Also I always use the focusing points and in the D4s they moved it in front where now it take me a couple of seconds to switch them from single to 51 points whereas the D3s I just need to switch with my right thumb. On the D4s I will have to press the button with my left hand and turn the front dial with my right hand to switch focusing points which takes so much time. By the time I chose the right focus point, the moment is gone. Now here Im slightly complaining.

The D3s’s focusing points, fast and easy switch one point to another
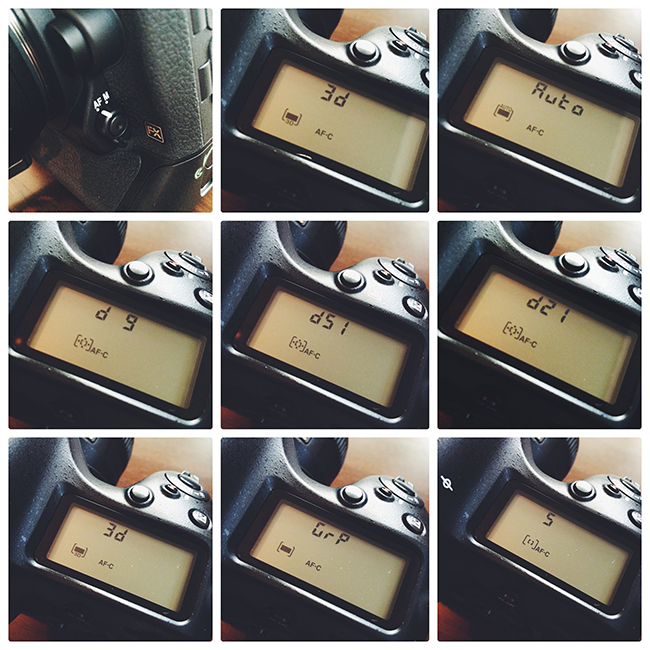
The D4s’s focusing points. Push button first on the AF-M switch, then turn front dial to change focus points
Enough with the ergonomics. Its time to get down to business. The output, the sensor and the overall experience.
D3s vs. D4s
D3s only have 12.1mp which is very much ideal for wedding files, not too heavy and not too low either, even if I use raw files work load is still smooth.  D4s have 16.2mp, this is heavy already for us, yes it give more details but it slows down our work flow.  I can’t use raw on this cam for weddings, probably only when dealing with advertising projects. The beauty of it is, I dont have to use raw on the D4s, as I will explain why on the next paragraph.
This time, patience is a vertue. There’s a reasons why I skipped the D4. Everyone have heard and experienced the problems that came with the D4 and D800. Seems they have addressed these issues on the D4s, especially the greenish tint color when viewing images at the back monitor of the D4 & D800, you cant seem to get the right skin tone. On the D4s, you can tweak this to your color preference to match output, yes you read it right, you can adjust the monitor’s color temp. Cool eh!  The new sensor performs leaps and bounds from my D3s. What I love about the Canon’s is their ability to control its contrast, and the Nikon’s ability to produce vibrant colors. Now, seems like they were able to combine the two on the D4s. Huwaattt! Are you kidding me?! It is that amaaaazing! Combined with its high ISO performance, it is a killer. Some may argue that the color output of the D3s is still more beautiful and more vibrant, I can somewhat agree on this. But will still prefer the D4s over the D3s if I have to pick one. Not only it controls the contrast so well, the colors still have the right consistency in my perspective and very easy to manipulate even when you’re using jpeg files.  In the D3s you have to use raw in order to manipulate contrast and color better.
After telling you all of that, I guess Nikon knew that a 16.2mp raw file is too big for weddings, that’s why they made this additional very cool feature of…..drum roll please!…. “SMALL RAW”.  Now what the hell is this?  Here is the native file size of the D3s, 4,256 x 2,832 pixels Large, and now here is the D4s, 4,928 x 3280 (16mp) Large / 3,696 x 2,456 (9mp) Medium / 2,464 x 1,640 (4mp) Small.  If you want the benefits of the Raw file but dont want the burden of the heavy work load you can now set your camera to “RAW S or RAW SMALL”.  I have read a lot both positive and negative comments about this feature, for me I’m on the positive side.  It is just a matter of how and where you are going to use it.  Down side is that you need to access this inside the menu, and you can’t assign it to any button for fast activation from Raw L to Raw S.  That’s ok, still loving the idea of having this cool feature.  If only they made it to Raw M, I would be a very happy camper and give it 5 out of 5 stars for this feature, but i guess you cant have it all so 4 stars would be reasonable.

A very cool feature of the D4s
Focusing, with its new 4 point focusing system it is just like a magnet to the subject. The D3s is fast but not as fast as this. It focuses so fast that sometimes I’m pressing focus more than twice because Im not sure if the lens moved to focus. (fyi, I turn off my beeping focusing sound, because it gives away that you are taking a picture).
")
D4s’s four group focus points
I havent pushed the ISO as far as it can go yet but at 800 ISO it looks like 400 ISO, and at 2000 it looks like 1000, the rest you can do the math. It is in fact much cleaner than the D3s, with my D3s I only go as far as 2000 and this is pushing it already for me.
For the batteries, what they say are true, D4s batteries indeed gives more power and lasts longer. The old black ones doesn’t work on the D4s and same goes with the grey’s on the D3s.  This I am hating, they should have made it compatible to all pro bodies and just upgrade them for more power.  I guess more profit for them here.

Top: for D3s / Bottom: for D4s
You can see that I am talking more about the D4s than the D3s. Don’t get me wrong the D3s is still a very good camera and I like it, But there’s so much improvement in so many levels in the D4s that I have fallen in love with Nikon all over again.  What I miss with the D3s though is that it carries 2 CF cards, where the D4s carries one CF and the other is XQD, which it is very hard to find in the Phil.  In fast pace shooting, transferring files with the D3s is faster since you have 2 CF cards inside, take one out to transfer and still keep shooting.  On the D4s, take CF out and replace with blank one then shoot.  This is crucial if you dont want to miss a moment, but be careful doing this so fast, you might damage and bend the contact pins for the CF cards. Only assuming you dont have XQD card like I do.
Some would say do you really need such equipment to cover a wedding?  The answer is no, but with the style and work flow I do and offer…a big YES! I still cringed everytime I remember that these cameras are worth a quarter of a million plus each, but I can say that it is really worth it. I was contemplating on jumping on the other side already, since Nikon support here in the Philippines is very very very very poor.  Then the D4s came out. Overall Im very happy with this camera inspite of the lack of support from Nikon, just don’t remind me how much this camera is worth.
June 16, 2014
I will try to keep all my reviews short and straight to the point. But first, let me tell you why I am starting to do my own reviews. Before I purchase and decide whatever item I will be getting I always do some research, get opinions and weigh the pros and cons.  Most of the time though, I find the same reviews over and over and not really what truly matters when using them on the field.
So, for this first ever REAL WORLD REVIEW, I shall be reviewing Carryspeed camera straps Tuxedo and Slim Prime as well as the Blackrapid R7.
Blackrapid R7
I have been using Blackrapid for years already. Like all things there are pros and cons. And these are my opinion based on how I use them and what I am looking for on a camera strap.
Pros:
– simple to use
– thin shoulder padding
– easy clip on to camera
– low maintainance
– easy storage
Cons:
– Clip starts to show extreme wear and tear in 8 months time with continuous use.

– Extra cord/strap at the back that is used to lengthen or shorten the strap loosens since there is nothing to hold it in place.

– The lock clips doesn’t do any good for me either.
– No security strap in case connector fails or accidentally unscrews itself to the body. This happens when moving constantly while shooting, bringing the camera up and down, standing up from squatting position, going in and out of service vehicle in a hurry, juggling with 2 – 3 camera bodies and changing lenses. All of these contribute to loosening the screw mount on cam, which every now and then needs attention.
Carryspeed Tuxedo and Slim Prime

Top: Tuxedo. Bottom: Slim Prime

Black plate: Tuxedo. Red plate: Slim Prime
Slim Prime is more smoother and have round edges whereas the tuxedo has more defined corners.

Since both straps have a similar allen wrench, only the tuxedo’s ball joint can be removed.
I just recently found out about the extreme wear and tear of my Blackrapids, so I immediately searched online for the best alternative and found Joby camera straps. Simple design, easy to handle and with the technology of comfort, versatility and safety all in one item. I found the holy grail of camera straps! Unfortunately it’s not available here, dammit! So the search is on again. I have already seen the Carryspeed but the design is so “in your face†for me. I want a strap that goes under the radar. I never really considered this brand until a photographer  friend explained it’s functions, I got intrigued and searched more about it. I can no longer delay getting new straps, the inevitable is just around the corner for my Blackrapids so I went to Quiapo and found CS tuxedo. All the features I like are there except for the safety measures, still I purchased one to test, and I can’t believe that I liked it. It will just take some getting used to handling with a plate under the camera. The connector ball to the strap is located underneath the lens and body  right where you  hold the cam with your left hand for support and for adjusting the ring of the lens. It gives an awkward feeling, it’s driving me crazy for now but I know I will get used to it.
After purchasing the Tuxedo, I kept on surfing the net until I came across the Slim Prime. Same features but different plates and the locking system of the ball is different too. Not only that, there is this safety cord incase,  God forbid, the plate screw mount loosens or in another scenario, the ball and locking mechanism breaks. This safety cord will give a surviving chance for your beloved camera and give you ample time to react and grab that camera like your life depended on it. Well for us pros our life really depends on it.
Here is a short video on how the slim prime locks the ball joint. No more screws, nice eiy! Now my concern for this is, I know there is a spring system going on to push the lock, the question is how long will the tension of the spring last? Time will tell I guess. But for now I’m liking it.
Since most Carryspeed plates have a feature that you can bend the ball joint, the Slim Prime is more smoother to bend.
The shoulder strap of the Slim Prime is much more comfortable than the Tuxedo. I know they are both made for different camera bodies and most of  you would recommend the pro straps for the type of bodies I use, but that is so “ hey I’m a photographer and I’m using a BIIIG strap!† That’s not me.
What are the cons:
– Storage. You will have to remove the plate instead of just unlocking the strap from the ball.  Otherwise the body wont fit with the ball sticking out like a sore thumb if you’re using each and every space of your camera bag or case.
Overall, I’m happy with the Slim Prime so I bought the last 3 stocks available. Can’t wait to shoot with them. Hope you got something on my very first official REAL WORLD REVIEW.
I would love to know your thoughts and experiences about these straps, if not these what other brands are you using and how does it work for you.  Don”t be afraid to comment below.
Untill next time!
Thanks!
– Paul